The scenario I faced is such that I like to create screenshots of the sky, certain constellations and surroundings of selected stars in a (semi-) automated manner so that I can use these screenshots in other documents or an outlook on the sky in the coming week(s).
There is two way to approach this:
Internal scripting engine
There’s a nice example by Ingo Berg, found on GitHub which creates a video file with the sky for a given time and period. This writes a custom script and then calls stellarium, telling it to run this script. This scripting approach is also very useful when you want to run a presentation. There are many more examples for such scripts on Stellarium’s website – it also comes by default with a selection of useful ones.
REST-API and remote control
My approach is to use the REST-API of stellarium to remote control is, obtain and set all parameters as needed. So I’ll talk about this.
Activation
First thing to note is, that you can actually use the the remote control feature to – remote control. That is you can control Stellarium’s action on one machine over the web via your browser, sitting at a totally different location. In order to activate it, you first need to go to ‚extensions‘ and select the ‚remote control‘ (German ‚Fernbedienung‘ – it took me some time to figure out that I need to look for the translation) plug-in. Then re-start and activate the server in the plug-in’s configuration. You might choose to automatically activate the server upon start:
Once activated, you can access your Stellarium instance (by default) via http://localhost:8090/api – that’s ok, if you do not need access externally.
Calling the API – GET
I chose to wrap the external calls into a python script so that I can later make use of the data more easily. So I start with the definition of the main API url and have a look at the current way Stellarium looks like, requesting the status. The whole status is quite extensive, so I limit the printed part to field-of-view (yet the ‚response‘ contains the complete answer. It is obtained by a GET request:
import requests
import subprocess

url_main = "http://localhost:8090/api/"

url_status = "main/status"
response = requests.get(url_main + url_status)
print("Status: ",response.status_code)
if response.status_code == 200:
    print("Time: ", response.json().get('time'))
    print("Location: ", response.json().get('location'))
    print("View: ", response.json().get('view'))
The output of this is json, which in python is equivalent to a dict:
Status: 200

Time: {'deltaT': 0.0008135227634797573, 'gmtShift': 0.041666666666666664, 'isTimeNow': True, 'jday': 2458448.965495926, 'local': '2018-11-26T12:10:18.848', 'timeZone': 'UTC+01:00', 'timerate': 1.1574074074074073e-05, 'utc': '2018-11-26T11:10:18.848Z'}

Location: {'altitude': 72, 'country': 'Germany', 'landscapeKey': '', 'latitude': 52.26594161987305, 'longitude': 10.526729583740234, 'name': 'Braunschweig', 'planet': 'Earth', 'role': 'N', 'state': 'Lower Saxony'}

View: {'fov': 60}
Great, the returned HTTP status code of 200 indicates that everything went fine. And the answer’s json is nicely populated.
Calling the API – POST
So what’s next? Let’s try to change something. This is done via a POST request. You need to define the parameters in a dict which you give to the data argument of the request. One of the most obvious things is a change in the time, so let’s try. We use 60 days later than the date we just got from the status request:
# Set an arbitrary date (60 days further than currently)
jd_next = response.json().get('time').get('jday') + 60
url_time = "main/time"
param_main = {'time':str(jd_next)}
answer = requests.post(url_main+url_time, data=param_main)
print("Set time: ",answer.status_code)
Which again gives HTTP 200 (ok) as answer. But there is no json variable to query as we changed a value.
Settings and Screenshot
So, in order to generate nice, consistent screenshots which do not depend on the initial state of stellarium, you likely want to define the view, thus set the field-of-view (FOV) in degrees, and the direction we look at:
# Set the field of view to cover the whole sky
#   and leave a small border at the top and bottom
param_fov = {'fov':'190'}
url_fov = "main/fov"
fov = requests.post(url_main+url_fov, data=param_fov)
print("FOV: ",fov)

# Set the view to face upward, but slightly South
#   so that is North is up
param_view = {'altAz':'[0.0001,0,1]'}
url_view = "main/view"
view = requests.post(url_main+url_view, data=param_view)
print("View: ",view)
The viewing direction when set as altitude and azimuth is a 3-tuple in the form of [South, East, Altitude] where each value has a range of -1 … 1. You should define at least a tiny portion in the Southern or Eastern direction as otherwise the view jiggles as the orientation of the view is ill-defined.
Now, we set-out to create a screenshot. However the documentation of Stellarium does not list all possible actions (I presume it depends on what plug-ins and extensions are actually active, so no comprehensive list can be given). As such, have a look for the list of available actions, and then go through them in order to find what you need:
# Get a list of available action IDs:
url_actions = "stelaction/list"
actions = requests.get(url_main + url_actions)
print(actions.status_code)
if actions.status_code == 200:
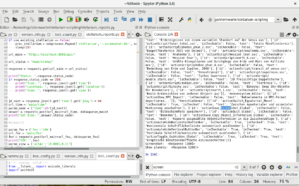
print(actions.json())
This gives a very lengthy list which takes a few screens to scroll through in my case. Grep the output for whatever you look for. Searching for ’screen‘ was the 4th hit in my list:
So {‚id‘: ‚actionSave_Screenshot_Global‘} is the parameter payload we need for a POST request in order to create a screenshot:
# Create a screenshot of the current view
url_screenshot = 'stelaction/do'
screenshot = requests.post(url_main + url_screenshot, data={'id':'actionSave_Screenshot_Global'})
print("Screenshot: ",screenshot)
So, there we are, this creates a screenshot:

You might want to set and unset a lot of things so that your screenshots really look the same every time you call the script, e.g. ensure that planets are visible etc. E.g. the visibility of planets can be toggled by an action similar to creating the screenshot.
# Toggle the visibility of the planets
url_planets = 'stelaction/do'
planet = requests.post(url_main + url_planets, data={'id':'actionShow_Planets'})
print("Show planets: ",planet)
The return value, here planet.json() will indicate the state of visibility after executing the toggle. But you know part of the initial state already from the status query at the beginning. You can get the status of many more settings with the property list
In [19]: prop = requests.get(url_main+"stelproperty/list")
    ...: print(prop)
    ...:
    ...:
<Response [200]>

In [20]: print(prop.json())
{'ConstellationMgr.artDisplayed': {'canNotify': True, 'isWritable': True, 'typeEnum': 1, 'typeString': 'bool', 'value': False, 'variantType': 'bool'}, 'ConstellationMgr.artFadeDuration': {'canNotify': True, 'isWritable': True, 'typeEnum': 38, 'typeString': 'float', 'value': 1.5, 'variantType': 'float'},
...
Thus check the state of things with this call and execute the toggles only, where needed.
Influence of Stellarium Version
Note that you might need Stellarium 0.18.2 for the code presented. I tested it briefly with 0.15.0 (which seems to be the earliest version to support remote control). Setting the viewing direction stopped working for that version as the API was changed and extended since and doesn’t support the method presented here. Thus when writing your script, make sure you consult the docs of the Stellarium version you use yourself. However from a brief check, the API seems so-far backward-compatible, so the script will continue to work with future Stellarium versions.
Summary
It works like a charm once you get used to the API. You need to obtain many names of the properties from calls to the API as they are not listed in the API documentation explicitly – but that’s not a big problem.
So it will be reasonably easy to use this in scripts to create nice monthly overviews and observation recommendations.